Friday, March 4, 2011

I wish I was normul

My lovely bloggy friend, Beki, does a carnival every Friday called "Fingerprint Friday" for people to share where they see God's fingerprints in their lives. Do you have anything to share? Why not link up over at her blog?

It's been a rough couple of weeks around here. My daughter's diabetes has been acting up and it's been putting us through the ringer. There have been a lot of nights with very little sleep and my daughter feeling really yucky while I did everything I could to try to keep her from having to go to the emergency room. Not fun. Not fun at all.

In our house, we have a two-story entryway and my daughter's bedroom door is right next to the railing upstairs. My daughter has figured out how to use this to her advantage. When she's been sent to her room, she likes to write notes then throw them over the railing for me to find on the ground. Lovely, caring notes. Yeah. (See here, here and here.) Then the other day, I found this one...


Photobucket

That one broke my heart.

It was time to have a talk.

She snuggled into my lap and I asked her about the note. She told me that she hated having diabetes and she wished she could be like "normul" people. I told her that I hated that she got stuck with diabetes, too, but there really isn't anyone who's normal. God made each and every one of us to be different and unique. We all have special gifts that He's given us. We all have burdens, too, but how we face these things makes us who we are. She's been so brave facing her burdens and I've been so proud of her for it! The way she's faced them makes her gifts shine more brightly. I told her that I hoped she never tried to be normal, but would always let the gifts that God has given her shine through.

Photobucket

She's 8 years old now. I wonder how many more times we'll be having this conversation in the years to come. I still have to have this conversation with myself from time to time. Wouldn't it be nice if we could see ourselves the way God sees us?

Wednesday, February 16, 2011

Homemade Laundry Soap

Yes, I know that there are recipes all over the web for homemade laundry soap. So why am I putting up another post? Because my online friend, Sarah, asked me to! And because it seems that most of the posts out there are for the liquid version of the recipe. Before I started making my own soap, I used liquid laundry detergent, but the idea of having a big ol' 5-gallon bucket of detergent to have to find a spot for in my laundry room is just not my idea of fun. The powdered version is much more compact and manageable, plus it can sit right on top of my dryer. I've also read comments online that the liquid version seems to turn your whites a bit gray, and I've not had that problem with the powdered kind. So, how do I make it? Easy!


Photobucket

It only takes three ingredients: Borax, washing soda (NOT baking soda) and Fels Naptha laundry soap. I've heard of people using Ivory soap in their recipe, but I can't tell you how that works since I've never tried it. These three items took a bit of searching for me to find. My beloved Target only carried the Borax - say it isn't so, Target! But after searching a few grocery stores, I found one that carried all three.


Photobucket


You'll need to grate the bar of soap first. Everywhere I've seen this recipe online I've seen people hand-grating the soap. A little something I learned: Those people are crazy! Unless you're up for a strenuous arm workout, don't try it. This soap is really dense and doesn't grate easily! I took out my handy-dandy food processor* and grated it that way. Just cutting the soap into slices to put into the processor was arm workout enough, thankyouverymuch.


Photobucket

I then dumped the grated soap into a plastic tub (Why yes, that is a giant Red Vines tub I'm using. I'm not addicted to Red Vines. I can stop at any time. I just don't wanna.) and added 3 cups of washing soda and 3 cups of Borax. Mix well!


Photobucket

Find yourself a scoop you can use. Mine is an old coffee scoop that holds about a tablespoon. For a regular sized load of laundry, you'll only need to use 2 Tbsp. of soap. Yup! That's all you'll need! And since this soap won't get all foamy, it can be used in front loading washers, too. I've given some to both my mom and sister to use in their front-loaders and there hasn't been any problems.

This soap recipe will last you a good, long time, too. The ingredients cost much less than commercial detergents out there, and who doesn't love a bargain? I've been really happy with how well it cleans, too. The first thing I ever washed with it was my dog's very dirty bed cover. Ick. I was shocked to find it came out looking like new! If you have stained items you're going to be washing, you'll still want to pre-treat them like you normally would. This stuff is good, but it's not a miracle worker. I like it just as well as I did the Tide I used before, so that's saying something.

So, happy laundering! And remember, stay away from the grater. You'll be a happier person that way.

* If you have a light-duty food processor, you'll want to be careful if you try to grate the soap in it. Like I said, that soap is dense. You don't want to burn out your processor's motor!

Tuesday, February 15, 2011

Appreciation

Okay, I'm just going to say it. When it comes to all things computer, I am an idiot. Technology has not been my friend. Every once in a while, people will ask me a question thinking that I'd know the answer since I have a couple of blogs. After staring at them in stunned silence, I have to admit to them that I know nothing. Nothing except what I've been able to learn from others, that is.

Hi. My name is Wendy and I ask questions.

That's right. If I see something on someone's blog that I think is really cool, I'll email them and ask them how it's done. I'm very much in the "It doesn't hurt to ask" camp. And although some bloggers have been less than, um, giving, some have been wonderfully helpful. I love that!

The other day I did my first tutorial and ended up needing to use some drawings because I didn't take pictures of the process. While I'm actually pretty good at art, I was not thrilled with my quickly drawn, and very wonky, pictures. For a while now, I've absolutely LOVED the drawings that Meaghan over at the decorated cookie uses for her blog.
Photobucket Photobucket


Aren't these drawings cute as can be?!


Her blog is just full of wonderful things! You should really check it out when you have time. Anyway, she doesn't know me from Adam. The likelihood of her ever even reading my blog is slim to none. But when I emailed her to ask her how she did her drawings for her blog, she got back to me really quickly to explain how she does it. How nice is that? Don't you just love kindness?

I really appreciate the people who will take the time to help others. It's a nice trait, don't you think? And they're out there! So if you see something on a blog somewhere that you wish you could figure out, why not send off an email? Good things can come from asking questions.

Monday, February 14, 2011

Pasta e Fagioli Soup

Oh, how I love this soup! It's one of those soups that just make you feel all warm and cozy inside. And if you're watching your waistline, it's easy to make a low-fat version that tastes just as good as the higher fat version. Ready to fall in love with soup all over again?


Photobucket

Brown up your ground beef or ground turkey. When I make this, I use ground turkey. I've used the beef before and really? I couldn't taste a difference. Once the meat is browned, drain any fat left in the pot.


Photobucket

Add in all the other ingredients except for the pasta noodles and the beans. If you love your veggies, go ahead and double up on them for this recipe. Even throw in extras like spinach and celery if you'd like. It's fun to make a recipe your own! Cover pot and simmer for 30-45 minutes. If you're wanting to cut the fat and sodium, look for a 100% fat free and reduced sodium broth. I found one from Swanson that's good.

Photobucket

Add the pasta to your pot and cook until al dente (not all the way done), about 7-8 minutes. If you have kids, consider getting fun colors or shapes of pasta. It can be a good way to divert attention from the veggies...

Photobucket

Stir in the beans and lower the temp a bit. Heat through, about 10-15 minutes. As a side note, you might want to have extra beef broth on hand for this, especially when it comes time for leftovers. The pasta really soaks it up!

Photobucket

Around here, we love this soup topped with some parmesan cheese and served with garlic bread or bread sticks. Mmmmm... Bread... Enjoy your soup!

Pasta e Fagioli Soup

3 lbs. ground beef or ground turkey
2 C. chopped carrots
1 large onion, chopped or 1/2 C. minced onion
6 cloves garlic, minced or 3 tsp. minced garlic
8 (14 oz.) cans beef broth
1 (15 oz.) can crushed tomatoes
1 tsp. black pepper
3 tsp. dried thyme
3 tsp. dried basil
3 tsp. dried oregano
4 C. small pasta
2 (15 oz.) cans kidney beans, rinsed and drained


In a large pot over medium heat, cook the meat until it's browned. Drain and return to heat. Add the broth and all other ingredients except the pasta and beans. Cover and simmer for 30-45 minutes. Stir in the pasta and cook until al dente, about 7-8 minutes, uncovered. Reduce heat and add beans, cooking another 10-15 minutes until heated through.


Photobucket

Friday, February 11, 2011

Valentine Card Box

Photobucket

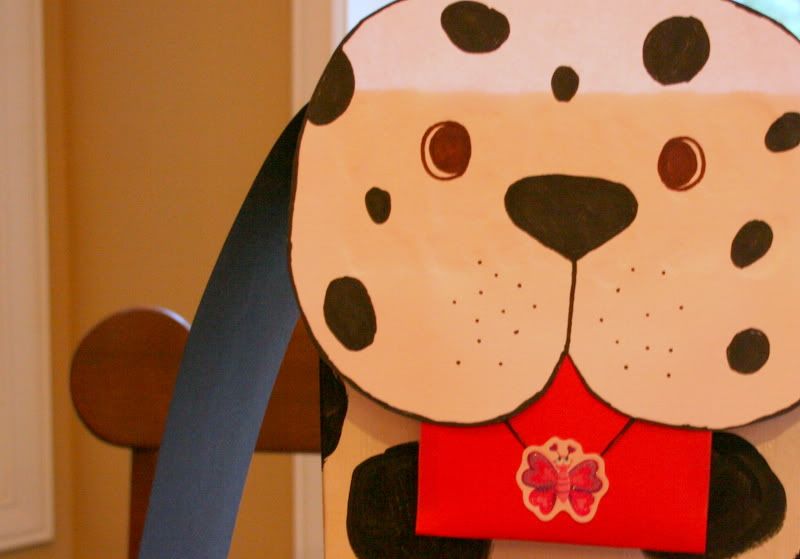
My daughter's 3rd grade class got an assignment to make Valentine card boxes to bring to collect their cards and goodies in this year. Being that she's completely dog crazy, I came up with this idea for a dog box for her and I to make together. She needed to have it in by today, so of course, we waited until last night to make it. I'm guessing that we aren't the only ones out there who've waited until the last minute and need a Valentine box, so I figured I'd do a tutorial in case anyone needed a little help out there. Unfortunately, I didn't think about doing the tutorial until after we'd completed the box, so I did some drawings to show the steps instead. Yes, I did the drawings, not my 8 year old. Next time I should probably consider getting out a ruler...

What you'll need

A box that has good depth to it (so it won't tip over when loaded w/cards)
paint and paint brush
markers
tape
glue
colored construction paper
card stock
box cutter or exacto knife
scissors
sticker

Photobucket

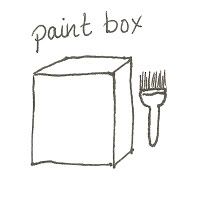
Close up the top of your box and paint it the color you'd like your dog (or other animal that your child picks). Once the paint is dry, tape down the sides of the lid so they don't stand away from the box.


Photobucket

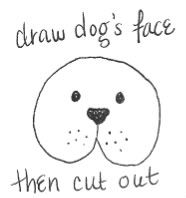
Draw the dog's face on the card stock. You'll want to make it about ½" to 1" wider than your box. Color in the face of the dog with markers or paint. We outlined the dog's head with black marker to make sure it showed up nicely.


Photobucket

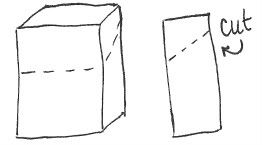
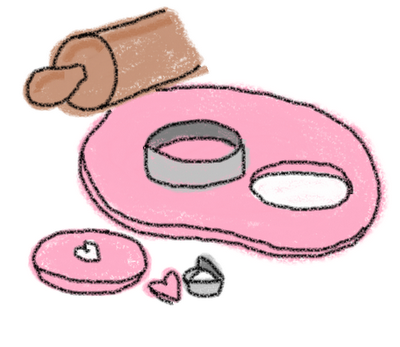
Draw a line across the front of the box that's a couple of inches above where the bottom of the dog's head will be. This will be where you'll need to make a cut. Then on the sides of your box, measure down a couple of inches on the back edge and make a line going from that measurement down to where it will meet up with the line on the front. You should have a diagonal line on each side like I've drawn in the picture above. Then very carefully cut along those lines with the box cutter or exacto knife, leaving the back of the box still connected. Fold back the part you've cut and that will become the lid of the box.

Photobucket

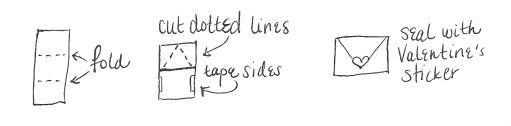
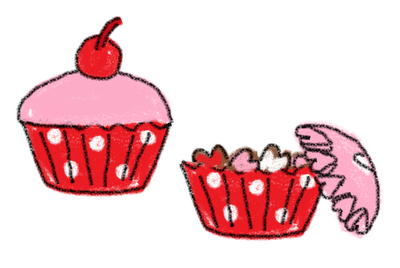
Now to make the envelope that the dog is holding in its mouth. Cut out a rectangular piece of construction paper that's width is suitable size to fit your dog's face. Make a three-way fold as I've shown in the above picture and tape the sides of the bottom two folds to create the pocket of the envelope. Cut the top piece in a triangular shape so that when it's folded down again, it will look like the back of an envelope. We took markers and outlined the edge of the pointed part so the shape will be seen more clearly. Then use a Valentine's sticker to close the "envelope."

Photobucket

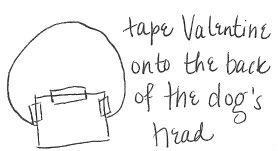
With the dog's head and the envelope face down on a table, tape the envelope in place so it will look like the dog is carrying it in its mouth.

Photobucket

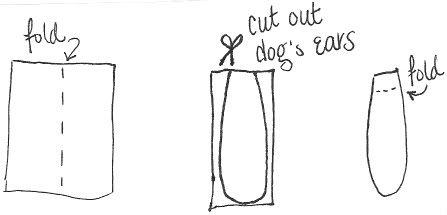
Take another piece of construction paper that will match your chosen dog and fold it in half so it's tall and skinny. Now cut out both halves at the same time in the shape of dog's ears. Keeping the two cut pieces together, fold over the tops of the ears about 1½" down.

Photobucket

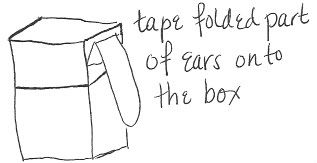
Tape the folded part of the ear on the side of the box up at the top. Taping it like this should let the ears stand out from the box a bit.

Photobucket

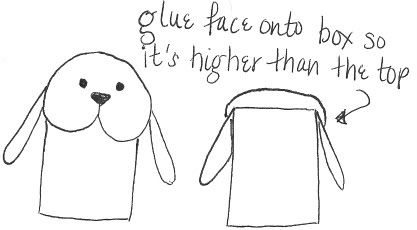
Glue the dog's face onto the front of the box on the lid you've created. You'll want to make sure the dog's face goes a bit higher than the top of the box while still hanging down a bit lower than where you've made the cut for the box lid. If you use white glue for this step, I'd recommend spreading out the glue on the box with your finger to flatten it down. Even card stock will ripple if you don't follow this step. Don't ask me how I know. Yeah.

Photobucket

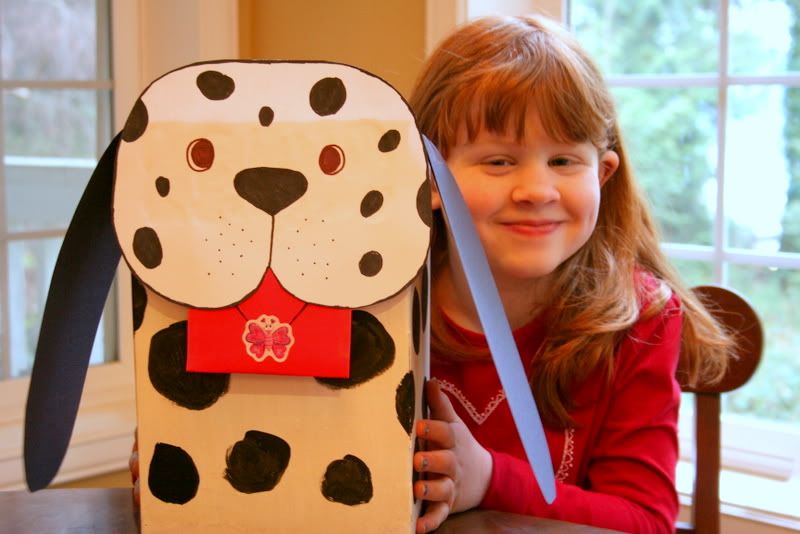
This box really was pretty easy to make, and my daughter had a really fun time making it with me. If you and your kiddo make one, I'd love to see pictures of it! Enjoy!


JoinusSaturdays at tatertotsandjello.com for the weekend wrapupparty!

Photobucket